


Road Cycling Techniques That Improve Cornering and Downhill Control with a Focus on Security for Weekend Rides Leave a comment
Road Cycling Techniques That Improve Cornering and Downhill Control with a Focus on Security for Weekend Rides
Mastering road cycling techniques that improve cornering and downhill control with a focus on security for weekend rides can transform your confidence and safety on the bike. Whether you’re navigating tight switchbacks or sweeping descents, proper body positioning, braking strategy, and line selection make all the difference. This guide breaks down essential skills—from weight distribution to vision control—so you can descend and corner more safely and efficiently, especially during casual weekend group rides where road conditions and traffic vary.
Why Cornering and Downhill Control Matter for Weekend Cyclists
Weekend rides often include scenic routes with rolling hills, sharp turns, and mixed traffic—conditions that demand more than just pedaling power. Unlike racers who train on closed courses, recreational riders face real-world variables: gravel on corners, potholes, parked cars, and unpredictable drivers. Poor cornering or braking technique can lead to skids, falls, or loss of control, especially at higher speeds downhill. Developing solid control skills not only prevents accidents but also conserves energy and improves overall ride enjoyment.
Consider this: a cyclist descending at 35 km/h (about 22 mph) has less than three seconds to react to an unexpected obstacle in a tight corner. Without proper technique, that window shrinks further. By refining your approach to turns and descents, you gain margin for error—critical when riding in groups or on unfamiliar roads.
Body Positioning: The Foundation of Control
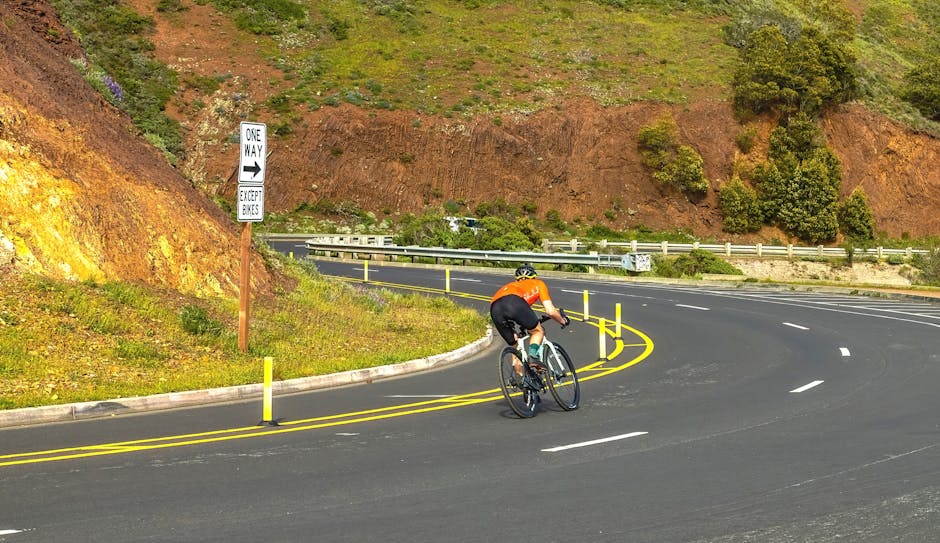
Your body position directly affects traction, balance, and responsiveness. On descents and corners, avoid staying upright and stiff. Instead, adopt a low, centered stance that keeps your weight over the bike’s contact points.
- Lower your center of gravity: Bend your elbows and knees slightly, keeping your torso low but not hunched. This improves stability and allows your arms and legs to act as shock absorbers.
- Shift weight back on steep descents: As the slope increases, move your hips slightly behind the saddle. This prevents the front wheel from diving and maintains rear-wheel traction.
- Keep your head up and eyes forward: Look through the corner to where you want to go, not at the ground or your front wheel. Your body follows your gaze.
A common mistake is leaning the bike too much while keeping the body upright—this shifts weight off the tires and reduces grip. Instead, lean the bike and your body together, keeping your inside pedal up to avoid scraping.
Hand Placement and Grip
Where you place your hands affects steering precision and braking power. On descents and corners, use the drops or hoods—never the tops of the handlebars.
- Drops: Offer the most control and leverage, especially in sharp turns or high-speed descents. Your wrists should be relaxed, not locked.
- Hoods: A good compromise for moderate speeds, allowing quick access to brake levers.
Avoid gripping too tightly—this leads to hand fatigue and reduced sensitivity. Think of your hands as “holding” the bars, not “clamping” them.
Braking Strategy: Slow Before the Turn, Not During
One of the most critical road cycling techniques is knowing when and how to brake. The golden rule: slow down before the corner, not in it. Braking mid-turn shifts weight forward, reduces rear-wheel traction, and increases the risk of skidding.
Front vs. Rear Brake: When to Use Each
Both brakes are essential, but they serve different purposes:
| Brakes | Best Use | Caution |
|---|---|---|
| Front brake | Primary stopping power; use for gradual slowing before corners | Avoid sudden, hard pulls—can cause front-wheel skid or endo |
| Rear brake | Modulation in wet conditions or loose surfaces; helps stabilize rear | Less effective alone; can cause skidding if overused |
On dry pavement, up to 70% of braking force should come from the front brake. Apply it smoothly and progressively—think “squeeze, don’t slam.” In wet or gravelly conditions, ease off the front and rely more on the rear to avoid locking the wheel.
Brake Before the Apex
The apex is the innermost point of the turn. Begin braking well before reaching it—ideally on the straight section leading into the corner. This allows you to enter the turn at a safe speed and focus on line and balance.
Example: On a 90-degree right-hand turn with a recommended entry speed of 25 km/h, start braking 30–40 meters before the turn. Feather the brakes gently, then release them completely as you lean into the corner.
Cornering Line Selection: Ride the Smoothest Path
Choosing the right line through a corner can mean the difference between a smooth exit and a near-miss. The ideal line maximizes visibility, minimizes lean angle, and avoids hazards.
- Outside-in-outside: Enter wide, cut to the inside at the apex, then exit wide. This is the standard racing line and works well on open roads.
- Adjust for obstacles: If there’s gravel, debris, or parked cars on the inside, stay wider and take a “late apex” line—hitting the inside point later in the turn.
- Look ahead: Scan the exit of the corner, not just the curve itself. This helps you anticipate speed and positioning.
On narrow or poorly maintained roads, prioritize safety over speed. It’s better to take a wider, slower line than risk a slide on loose material.
Cornering on Wet or Loose Surfaces
Wet pavement, gravel, or sand drastically reduce tire grip. Adjust your technique accordingly:
- Reduce speed significantly before the turn.
- Avoid sudden steering inputs—make smooth, gradual turns.
- Use both brakes lightly if needed, favoring the rear.
- Keep your weight centered or slightly back to maintain rear traction.
Avoid painted road markings, manhole covers, and metal grates—they become extremely slippery when wet.
Downhill Control: Managing Speed and Stability
Descending safely isn’t about going fast—it’s about staying in control. Many weekend riders either brake too much (causing fatigue) or not enough (risking overspeed).
Use Momentum Wisely
Gravity does the work on descents. Instead of constant braking, use brief, controlled applications to manage speed. This preserves brake pads and reduces overheating—especially important on long mountain descents.
Tip: If your brakes start to feel spongy or smell burnt, you’re likely overusing them. Pull over safely and let them cool.
Stay Relaxed and Balanced
Tension leads to instability. Keep your upper body loose, your breathing steady, and your focus ahead. If you feel jittery, shift your weight back and ease off the brakes momentarily to regain composure.
On group rides, maintain a safe following distance—at least one bike length per 10 km/h of speed. This gives you room to react if the rider ahead brakes suddenly.
Group Riding Considerations
Weekend rides often involve riding in a paceline or small group. This adds complexity to cornering and descending.
- Communicate clearly: Call out “corner left,” “gravel,” or “slowing” well in advance.
- Match the group’s pace: Don’t brake abruptly in a turn—signal and slow gradually.
- Avoid overlapping wheels: Especially in corners, keep a straight line and predictable path.
If you’re new to group riding, practice descending and cornering in a quiet parking lot or empty road before joining faster groups.
Equipment Checks: Safety Starts Before You Ride
Even the best technique can’t compensate for faulty equipment. Before every ride, especially weekend excursions, perform a quick safety check:
- Tires: Inflate to recommended pressure (check sidewall). Look for cuts, wear, or embedded debris.
- Brakes: Squeeze levers—pads should contact rims firmly without touching the tire. Cables should move smoothly.
- Wheels: Spin to check for wobbles. Ensure quick releases or thru-axles are tight.
- Helmet: Must fit snugly and be undamaged. Replace after any impact.
Consider upgrading to tires with better grip (e.g., wider profile or softer compound) if you frequently ride on winding roads. Tubeless setups can also reduce puncture risk and allow lower pressures for better traction.
Practice Drills to Build Confidence
Like any skill, cornering and descending improve with deliberate practice. Try these drills on safe, quiet roads:
- Slow-Speed Cornering: Practice tight turns at 10–15 km/h, focusing on smooth lines and balanced leans.
- Emergency Braking: From 25 km/h, practice controlled stops using both brakes. Note the distance and refine your pressure.
- Descending Simulation: Find a gentle hill and practice weight shifts, braking points, and line selection without going too fast.
Record yourself (safely) or ride with a more experienced cyclist who can offer feedback.
Common Mistakes to Avoid
- Braking in the corner: Shifts weight forward, reduces grip, and increases crash risk.
- Looking down: Causes you to drift off line. Always look where you want to go.
- Over-gripping the bars: Leads to fatigue and reduced control.
- Ignoring road surface: Gravel, oil, or wet leaves can appear suddenly—stay alert.
Remember: speed is not the goal—control is. A smooth, safe descent is always better than a risky, fast one.
Final Takeaways
Improving your road cycling techniques that enhance cornering and downhill control with a focus on security for weekend rides doesn’t require elite fitness or expensive gear. It comes down to consistent practice, smart braking, proper body positioning, and situational awareness. By mastering these fundamentals, you’ll ride more confidently, reduce your risk of accidents, and get more enjoyment out of every weekend adventure.
Start small: pick one technique—like braking before the corner or keeping your eyes up—and focus on it during your next ride. Over time, these habits become second nature, transforming how you handle every descent and turn.
FAQ
How fast should I go into a corner?
There’s no universal speed—it depends on the turn radius, road surface, and visibility. A good rule: enter at a speed where you can stop within half your visible distance. If you can’t see the exit, slow down further.
Should I use the front or rear brake more when descending?
Use the front brake for most of your stopping power, but apply it gradually. On steep or technical descents, modulate both brakes to avoid locking the wheels or overheating.
What’s the safest way to corner in a group?
Maintain a steady line, avoid sudden braking, and communicate hazards. Ride predictably and leave extra space in corners. Never overlap wheels, especially when leaning.